Camera calibration
Each camera model used in the study, including smartphones, must be calibrated before acquiring study images.
Calibration consists of capturing 30 to 40 varied images (about 30 is a good target) of a calibration board from different viewpoints and orientations. It is a one-time step, completed separately for each camera model used during the study, not something repeated for every patient photograph.
The site may perform the calibration by following the instructions below, or may provide the camera to the study team so the calibration can be performed on its behalf.
Calibration board
The calibration board may be supplied either as a pre-printed physical board together with the study markers, or as an electronic PDF for local printing.
The board must be mounted on a flat, rigid surface, such as a wall or the floor. It must remain completely flat during calibration and must not be bent, folded, wrinkled, or otherwise deformed. It should be evenly illuminated and free from reflections, glare, shadows, and partial occlusions, and the complete board must be visible in every calibration image.
If the board is supplied as an electronic PDF
The standard way of working is for Legit.Health to send you the calibration board directly, already produced with the correct physical dimensions. This is the recommended option because it removes any risk of dimensional error introduced during printing.
If, exceptionally, the board is supplied as a PDF, it must be printed according to the instructions provided, and it is essential that the printed board has the correct physical dimensions. Printer settings such as Fit to Page, page scaling, or automatic resizing change the dimensions of the board and invalidate the calibration. After printing, verify the dimensions against the reference measurements, or measure them with a ruler or caliper.
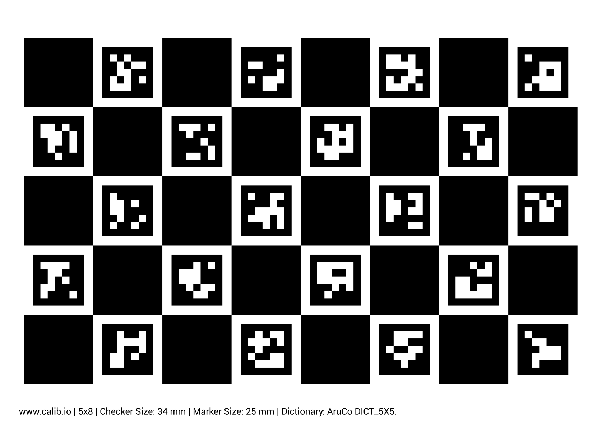
Example calibration board
Download the reference board: calibration board (PDF).
Camera requirements
Before calibration, confirm that the camera behaves as a conventional imaging device and does not perform automatic processing that could affect geometric accuracy. In particular, the camera:
- Must not modify the final image dimensions.
- Must not apply geometric corrections or distortions.
- Must not perform automatic cropping or resizing.
- Must not apply image processing that could alter the geometric relationship between objects in the image.
Image acquisition restrictions
These restrictions apply both during calibration and during study image acquisition:
- Use the same camera and lens throughout the study.
- Do not use digital or optical zoom.
- Do not crop or resize images.
- Do not apply filters, enhancements, or any post-processing that modifies the original captured image.
- Maintain the same camera settings and capture configuration throughout the study unless a new calibration is performed.
- Always keep the same image size: every image you send us, both the calibration set and the study images, must have the same pixel dimensions, and the size must not change from one image to the next.
- Match the calibration to the study: please capture the calibration images with the same camera, lens, and configuration you will use for the study images, so the calibration set matches the study conditions exactly.
- Keep the same image orientation: please capture every image in the same orientation for both the calibration set and the study images, and use vertical (portrait) orientation by default.
If the image size or orientation changes at any point, the calibration no longer matches the study images and the camera must be recalibrated before further study image capture.
We recommend calibrating in vertical (portrait) orientation, which is the default the marker capture instructions assume. When the calibration is vertical, sites simply follow the standard image capture guidance and no further explanation is needed. If you calibrate in a different orientation, that orientation must be specified explicitly to every study participant and used consistently for both the calibration set and the study images.
Calibration instructions
Preparation
Board setup
Ensure the board is perfectly flat and mount it on a rigid, non-reflective backing such as foam core or a clipboard. Any curvature in the board introduces significant errors in the calibration. Print the board on matte paper to prevent glare and reflections.
The board must be mounted on a flat, rigid surface, such as a wall or the floor. It must remain completely flat during calibration and must not be bent, folded, wrinkled, or otherwise deformed.
Lighting
Set up in a well-lit, evenly illuminated space. Avoid direct, harsh lighting that creates strong shadows or bright reflections on the board. Diffuse lighting is ideal, for example a large window on an overcast day, or multiple soft light sources.
Camera settings
- Fixed focal length: if using a zoom lens, set it to the focal length you intend to use and do not change it. Prime lenses are recommended.
- Aperture: use a moderately small aperture (a higher f-number such as f/5.6 or f/8) so the entire board is in sharp focus.
- ISO: set the ISO to its lowest native value (for example 100 or 200) to minimise image noise.
- Resolution: use the camera's highest native resolution.
Image capture procedure
The goal is to photograph the board in a wide variety of positions and orientations throughout the camera's entire field of view. Capture 20 to 40 high-quality images (about 30 is a good target). For each image, ensure most or all of the board is visible within the frame and that the image is sharp and free of motion blur.
Vary these three parameters systematically:
- Position (translation): move the board so it appears in different parts of the view: the centre, near the top, bottom, left, and right edges, and near all four corners.
- Distance (depth): capture images with the board at different distances, some filling a large portion of the view and some appearing smaller. This helps resolve the focal length accurately.
- Orientation (tilt): for each position, angle the board to capture perspective distortion. Start with the board flat and facing the camera directly, then vary pitch (tilt forward and backward up to about 45 degrees), yaw (turn left and right up to about 45 degrees), and roll (rotate in-plane).
Capture images that combine these tilts, especially towards the edges and corners of the view. Avoid extreme angles where the markers become too distorted to detect.
After capturing the set, review the images and remove any that show significant blur across all or part of the board.
Example: a complete calibration set
The contact sheet below shows an example calibration capture: 30 images of the supplied ChArUco board, taken with the main (wide) camera of an iPhone at its default focal length. It shows the variety a good set needs. The board is photographed across the whole field of view (centre, edges, and corners), at a range of distances (some frames filled by the board, some with it appearing smaller), and at varied tilts (pitch, yaw, and roll), while staying sharp and fully visible in every frame.
Use it as a reference for the spread of viewpoints to aim for, not as an exact shot list to copy.
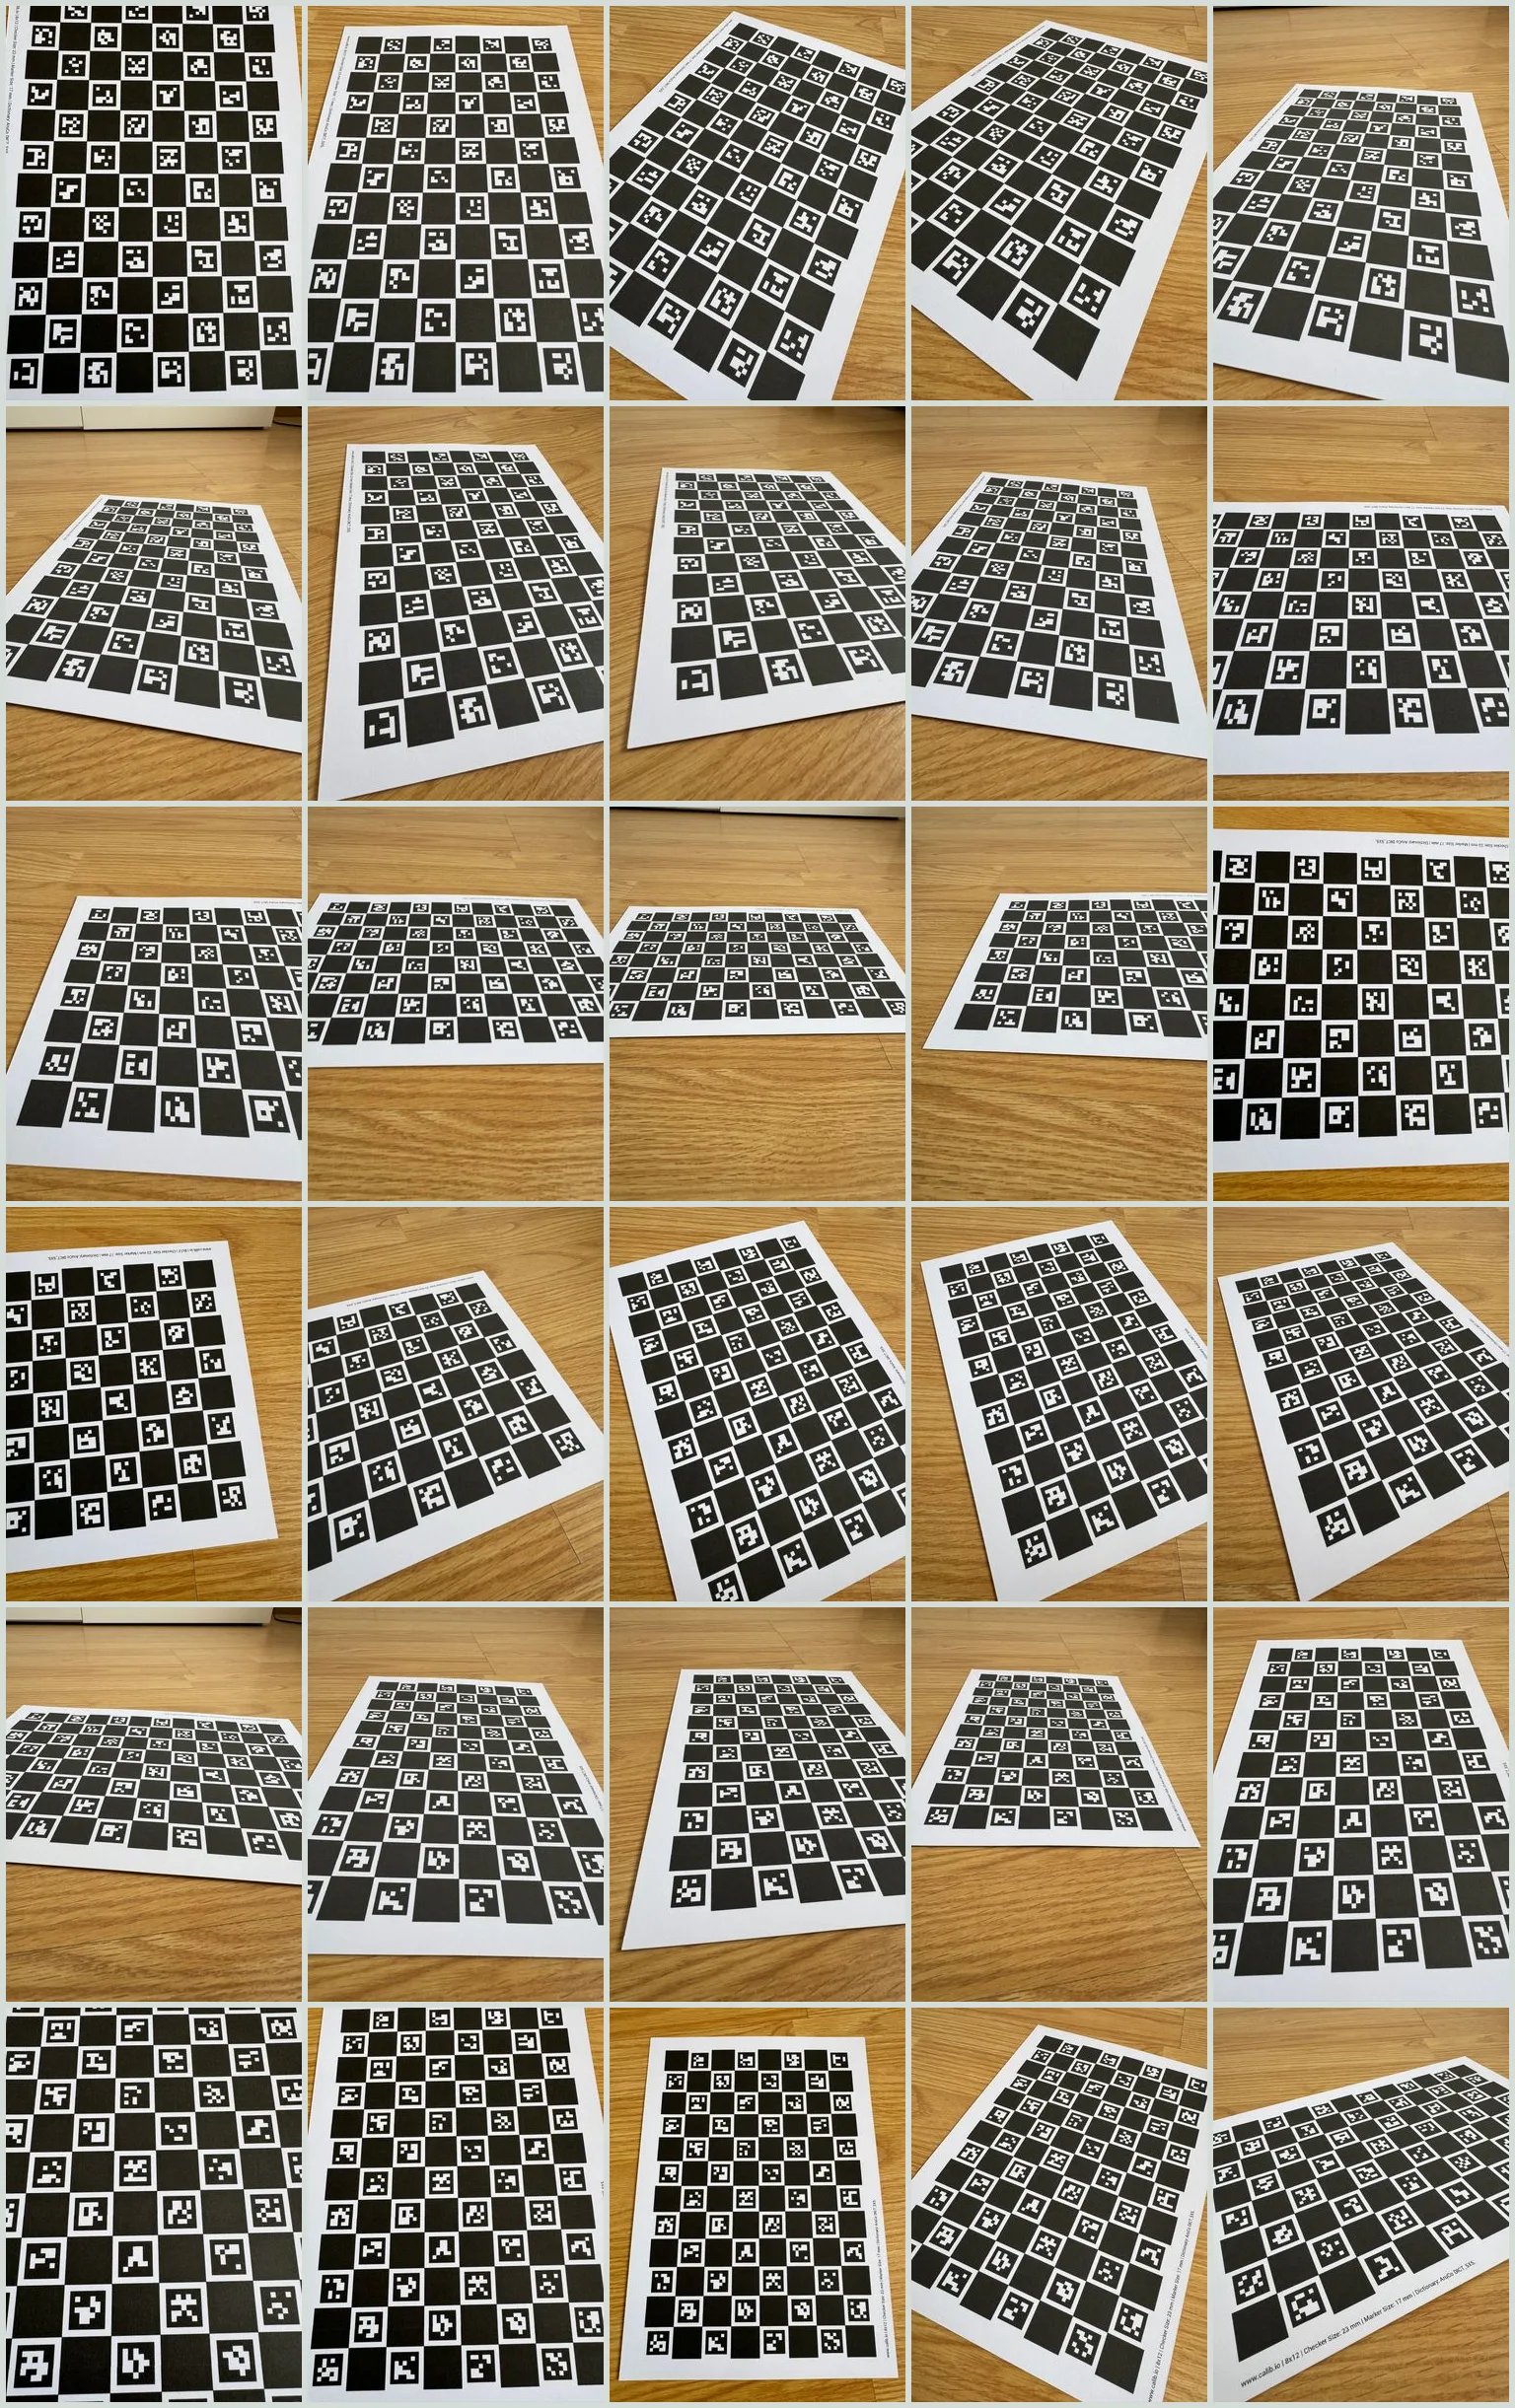
Example calibration set: 30 captures of the board from varied positions, distances, and tilts.
Submitting calibration images
Once the calibration images have been acquired, they must be submitted for processing. The calibration is validated by the Legit.Health team before the camera can be used for study image acquisition.
Submission by email
Send the calibration image set to support@legit.health. So the set can be matched to the correct study and camera, include the following in the email:
- Study name: the exact study identifier the site was given.
- Site: the site name or number.
- Camera model: the make, model, and lens (including focal length) used for capture.
- Calibration orientation: the orientation used for the calibration images (vertical or horizontal). Vertical (portrait) orientation is recommended.
- Number of images: the count of images attached.
- Attachments or upload in the defined path: the full calibration image set (your complete set, typically about 30 images) in a single .zip file, at the camera's native resolution. Submit standard 2D photographs only: one view per image, with no stereo capture, zoom, cropping, or other edits.
The Legit.Health team processes the images and confirms the result to the site.
Example email:
To: support@legit.health
Subject: Camera calibration - [Study name] - [Camera model]

Hello,

Please find attached the calibration image set for the following camera. Could you validate the calibration and confirm whether the camera may be used for study image acquisition?

- Study name: [Study identifier]
- Site: [Site name or number]
- Camera model: [Make, model, and lens, e.g. Canon EOS R50 with RF 35mm f/1.8]
- Calibration orientation: [Vertical recommended, or Horizontal if used]
- Number of images: 30

Thank you,
[Name, role, site]
Turnaround is within 7 business days when the calibration is processed manually, and immediate when it is run through the online platform we provide, where that service is requested.
- Calibration successful: the camera has been calibrated and may be used for study image acquisition.
- Calibration unsuccessful: the submitted images did not meet the calibration requirements. The site is asked to repeat the procedure and, where applicable, receives guidance on how to improve image acquisition.
If calibration is unsuccessful
Review and improve the calibration image set before submitting again:
- Remove poor-quality images (blurred, taken too close or too far from the board, or captured from excessively oblique viewpoints).
- Acquire replacement images so the set still contains 30 usable images.
- Capture more images from viewpoints that are not sufficiently represented.
Once the set has been improved, resubmit the images for processing.
Recalibration
The camera calibration remains valid only while the imaging configuration is unchanged. If any camera setting or configuration is modified after calibration (including, but not limited to, image resolution, focal length, lens, firmware, camera software, or any parameter that may affect image acquisition or geometry), the camera must be recalibrated before it is used again for study image capture.
Alternative board supplied in electronic format
The standard way of working is for Legit.Health to send you the calibration board directly, already produced with the correct physical dimensions. This is the recommended option because it removes any risk of dimensional error introduced during printing.
If, exceptionally, the board is supplied as a PDF, it must be printed according to the instructions provided, and it is essential that the printed board has the correct physical dimensions. Printer settings such as Fit to Page, page scaling, or automatic resizing change the dimensions of the board and invalidate the calibration. After printing, verify the dimensions against the reference measurements, or measure them with a ruler or caliper.
Example calibration board
Download the reference board: calibration board (PDF).